The frame for the main section of the deck is completed which overall was a reasonably straight forward affair, so now it's time to work on the trickier parts! Please put your chair in the upright position and ensure that your tray-table is securely stowed as we prepare for the landing.
To join the deck to the back door there's a landing required, and two steps from the landing down to the main deck proper. The steps at the front protrude 60 cm out past the line of the house and wrap around providing steps on three sides with the deck boards mitre joined on the corners. The steps to the side are straight steps within the line of the house.
The plan below shows the posts, bearers and joist locations.
The bearers, like the main deck, are made up of dual 90 x 45 mm MGP10 treated pine nailed together. The 100 x 100 mm treated pine posts were fixed to the concrete using Pryda bolt-down post anchors. Mounting and assembly was pretty straight forward.
Once the bearers were complete, the 90 x 45 mm MGP10 treated pine joists were laid across them. For the first time in 8 years we could now walk out the back door without the BIG step!
To join the deck to the back door there's a landing required, and two steps from the landing down to the main deck proper. The steps at the front protrude 60 cm out past the line of the house and wrap around providing steps on three sides with the deck boards mitre joined on the corners. The steps to the side are straight steps within the line of the house.
The plan below shows the posts, bearers and joist locations.
 |
| Please put your tray table into the upright position and prepare for landing! |
The bearers, like the main deck, are made up of dual 90 x 45 mm MGP10 treated pine nailed together. The 100 x 100 mm treated pine posts were fixed to the concrete using Pryda bolt-down post anchors. Mounting and assembly was pretty straight forward.
 |
| Bearers in place |
Once the bearers were complete, the 90 x 45 mm MGP10 treated pine joists were laid across them. For the first time in 8 years we could now walk out the back door without the BIG step!
 |
| Joists laid |
The final part of the joist assembly was to fix a joist across the front with 90 mm treated pine screws, to which the step stringers will be attached (see below).
To calculate the stringers I used the stair calculator function from the Russian based 'construction calculator' site (check out my resource page for this and other on-line tools) to get the dimensions of the stringer, and from this I created a cardboard template which I used to mark out onto the timber the stingers to be cut. To fix the stringer to the deck I added an extra cut of 90 x 45 mm into the front of the top step, so that it can slot in under the front joist.
To calculate the stringers I used the stair calculator function from the Russian based 'construction calculator' site (check out my resource page for this and other on-line tools) to get the dimensions of the stringer, and from this I created a cardboard template which I used to mark out onto the timber the stingers to be cut. To fix the stringer to the deck I added an extra cut of 90 x 45 mm into the front of the top step, so that it can slot in under the front joist.
In the picture below you can see I have clamped three of them to the front joists to check for size and position.
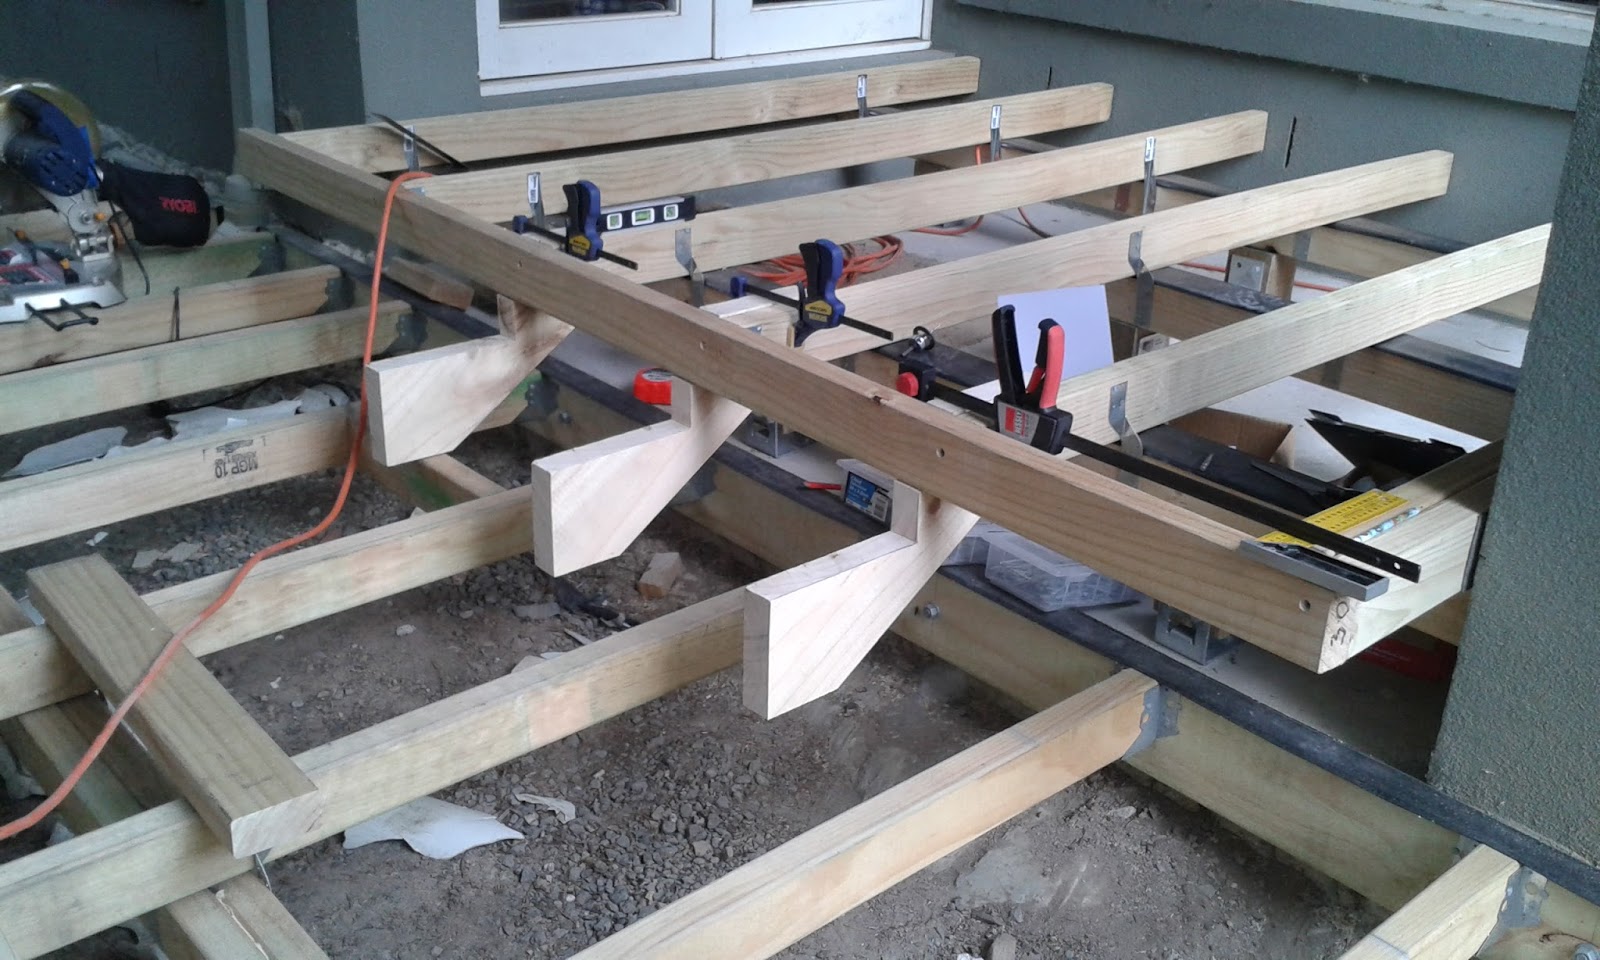 |
| Testing the steps |
To fix the stair stringers to the deck a 'noggin' needs to be added behind the end of the stringer to hold it in place against the front joist.
Step 1 mark it up. The noggin fits between the joists, so using the cut stringer place it against one side of the joist and mark the back end of the stringer on the joist, repeat on the other side. This is where the front edge of the noggin needs to line up on the joists.
Step 2 make the noggin. I used a piece of 90 x 45 mm MGP10 treated pine (aka joists offcuts!) and a pair of joist hangers to fit and hold the noggin between the joists.
Step 3 slip in the stringer. Slide in the top of the stringer up and in between the noggin and the front joist, lining it up with the joist from the bottom level
Step 4 screw it all in. Get a small level and make sure everything is plumb, then secure the stringer in place with 110 mm screws through the front joist and the back noggin into the stringer. Lastly secure the bottom of the step by screwing the stringer bottom at an angle into the bottom joist.
Below shows the first step stringer mounted and secured.
Below shows the first step stringer mounted and secured.
 |
| First step in place |
Repeat the process for each step stringer until you have one lined up with every bottom joist. Now when it comes to corners things get a little tricky.
The corners need to have a double stringer put in place, so you have somewhere the attach the ends of the decking boards on either side of the step. The ends of the stringers also need to fit in the same corner spot as all the other stringers on the corner, and things can get a little cramped.
To get around this I made the top of the assembled corner stringer short on top (as only the step itself needs to support weight) so it could fit in. I then relied on a noggins placed underneath the stringer, between the bottom joists, to hold the stringer in place and support the step. By doing this I didn't have to worry about supporting it at the top like the other straight stringers.
Below you can see the assembled corner.
Below you can see the assembled corner.
 |
| These corners are pretty tricky! |
Below is a close look at the assembled corner and the two noggins I added in underneath to support the step at the front and rear. The corner stringer was is screwed into the joists and the noggins to hold everything nice and secure.
 |
| It's a tight squeeze to fit it all in |
Below is the progress in assembling the stairs.
 |
| The landing is taking shape |
Below shows the final assembled front step frame. Here you can see the noggins that support the corner step on the other end. All this work will allow the steps to wrap around and have nice mitred joins on the corners.
 |
| Front steps frame completed! |
For the side steps there were no joists to support the bottom of the stringers, so I used Klevaklip adjustable joist supports. These are a great invention for mounting 45 mm timber into a concrete base, and can be used where you are building over concrete and don't have enough clearance for a bearer. You fix the base plate into the concrete with two bolts of sufficient length protruding, and then fit the support bracket to the bolts using a set of nuts and washers to hold them at the required height. This makes setting the height of the support fully adjustable.
The stringers were fitted to the deck using the same method as the front steps, by boxing in the top rear of the stringer. Below you can see I have clamped up the stringers to the front joist so I can set the height needed for the supports.
The stringers were fitted to the deck using the same method as the front steps, by boxing in the top rear of the stringer. Below you can see I have clamped up the stringers to the front joist so I can set the height needed for the supports.
 |
| Fitting in the side steps |
Below is the completed side step. I had to change the cut into the step and move it back about an inch into the rise because of the narrow width back to the next joist.
 |
| Side steps completed |
Below is the completed landing frame and steps.
 |
| Landing completed |
The council inspector was overall pretty happy with the landing frame, but thought that the "throat" of the stringer looked a little narrow, so asked me to infill behind the stringer to support the step. It wasn't a bad suggestion and reasonably easy to achieve, so I reused the offcuts from the steps to make the fillers up.
Measuring up the angle of the back of the stringer I cut the fillers and glued them between the underside of the stringer and the joist, and secured them in with 90 mm screws.
Below is the completed stringers with the supports fitted.
 |
| In-fills to make the Council building inspector happy |
Grabbing a couple of pieces of decking boards I can see that everything is squared off and the decking boards will wrap around the corners nicely.
Finally we can now walk out of the back door and onto the landing, albeit across the joists! Next up is to construct the frame for the much longer set of stairs that run from the top of the deck down to the lawn area.
Lucky I am now the stair master!
 |
| Checking the square of the mitre joins |
Finally we can now walk out of the back door and onto the landing, albeit across the joists! Next up is to construct the frame for the much longer set of stairs that run from the top of the deck down to the lawn area.
Lucky I am now the stair master!


