Showing posts with label permits. Show all posts

Wednesday, 9 September 2015

Deck Building. Building a flight of stairs

Now that I have become the stair master by building the two step wraparound stairs on the back landing, I now have to undertake the far longer set of stairs that run from the deck down to the lawn area. This is my first try at a full set of stairs so it's really all new to me. There's a really good instruction on stair building over at instructibles.com which was great for a newbie like me.

The first thing required is to figure out the rise and the run of the slope that the steps are to go down. The rise of a flight is the vertical distance between the floors or landings connected by the flight. The individual rise is the vertical measurement from top of tread to top of tread. The run is the horizontal distance covered by the entire staircase, or technically the distance from the trimmer face to the front of the first steps nosing. Using a long piece of straight timber clamped to the existing joists, and a plumb bob and tape measure, I obtained the rise and run.

With this data in hand I then headed over to the stair calculator web site and plugged the measurements into the X and Y fields. I then start playing around with the number of steps and the width of the stinger, until I am happy with the height of the step and depth of the tread, and I then have the measurements for the required stringers.

Using these dimensions and a large framing square with stair gauges, I draw out the stair pattern on the stringer just like the photo below.


Once you have the stringer marked out you can attack it with a combination of a circular saw to do the long cuts and a jigsaw the finish the corners. Be as accurate as possible with the first stringer as it will become the template for the rest of them to follow. In my case I need five stringers.

MEASURE TWICE, CUT ONCE is the old carpenters rule of thumb. Stick to it.


Before I can lay any kind of woodwork in I need to create a concrete pad for the bottom step to attach to. Per the photo below, once I had cut the first stringer cut I used that to help measure and position the form for the pad.

Measuring up for the form

With a pair of stringers cut, I positioned them on the outside and clamped them against the joists to hold them in place, then measured and levelled everything before mixing and pouring the concrete for the pad.

Checking and preparing for concrete

Once the concrete was cured and the form removed, I then clamped on four stringers just to make sure I hadn't missed anything! As you can see below, it all came out level.

Checking everything for level

The picture below shows all the stringers attached and in place, I bolted the stringers to the concrete pad using galvanised steel L brackets with Loxins to go into the concrete, and diagonally set coach bolts through the stringer into the bracket.

All stingers attached and bolted in place.

To attach the top of the stringers to the deck I used exactly the same method I utilised to attach the small two step stringers to the landing in my previous post, by boxing them in. Below shows all the stringer top steps locked in tight between the noggin and front ledger.


Top of stringers boxed in screwed down

So that was it! Per the photo below the entire deck frame was now finished (or so I thought at the time!) and ready for the council building inspector to give it the big tick!


Entire deck frame completed and ready for the council engineer's inspection

So I booked in the inspection and the engineer came over to have a look. He's actually quite a nice guy who is, after all, only looking after the safety of myself and my BBQ guests! There was a couple of things he wasn't happy with in the frame:
  1. The width of the open string on the landing steps he felt was a little too narrow and asked that they be in filled underneath to support the step (see my previous post on building the landing)
  2. The stringers were too long a run to go unsupported. Even though they were within code, he felt there was going to be too much flex in the steps and that I should underpin them in the middle with a bearer to support them.
  3. Owing to the length of the stinger, he wanted to see the top connection into the noggin reinforced with some builders strapping to support them.
They were all worthwhile observations that I happily agreed to rectify! I was at last getting some value out of a local council service! Building is so much easier to deal with than planning (you can catch up on my council planning nightmare post here).

So I got to work, and using the pick and post hole digger, started in on digging post holes for posts to support the new bearer. Below shows where they will go in.


And here I was thinking I was done digging bloody holes!

Because everything was already in place and I was loath to dissemble, I used a slightly different method of putting in the bearer. Normally I would concrete in the posts, let it set, then attach the bearer etc. 

In this instance I dropped the posts into the empty holes, passed through the bearer and bolted it onto the posts. I then clamped the whole assembly to the underside of the stringers where I had cut a notch to accept the top of the bearer. Once this was all in place I then poured the concrete into the holes.

Once the concrete was set I then just removed the clamps and screwed the stringers into the bearer. Job done!


Completed supporting bearer in place

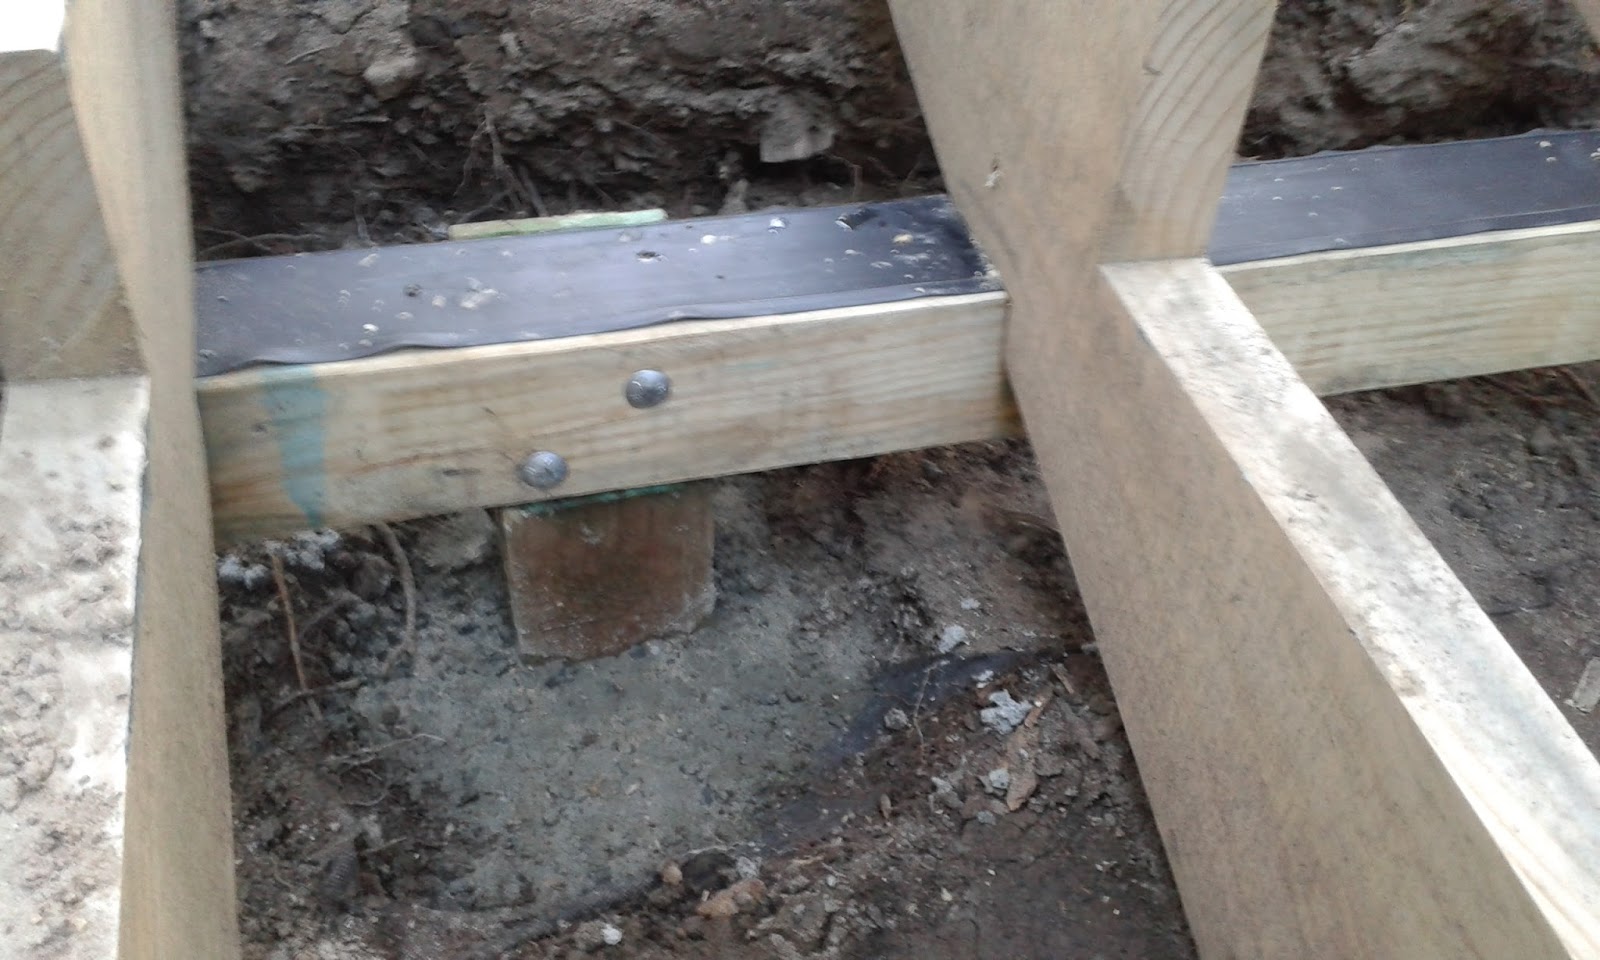
Below is a closer view of the bearer notched into the bottom of the stringer and screwed in place.


Notched stringer screwed into the bearer

The whole assembly was now really, really, really solid as a rock. Not an ounce of bounce!


The post bone connects to the, bearer bone, the bearer bone connects to the, stringer bone

The last thing required was to add the builders strapping to the underside of the top of the stringer and up the back of the noggin that holds the stair assembly in place. 

Trust me it wasn't an easy exercise, as I wasn't prepared to disassemble everything to attach the strapping to the bottom of the stringer. Some judicious digging was required so I could get a hammer in at the right angle to knock in the galvanised clouts!


Stringers strapped in nice and tight!

So the stair frame was now completed to the satisfaction of the council, and myself. After sending off the photos of the extra work the council was happy to sign off the frame stage of the deck. Happy days!


The finished stair frame signed off!

Next up we get to into selecting and laying the decking boards!
If you want to jump ahead to finishing up the stairs you can have a look here.

Tuesday, 4 August 2015

Deck building. Laying in the ledger and joists

Now that the main bearers are down it's time to turn attentions to the ledger board.

As previously posted a fair amount of preparation had to be done for the ledger board for structural reasons. The ledger is required because I couldn't get in close enough to the house to dig post holes due to all the concrete over-pour in the ground from the house slab foundations. The additional engineering complication was due to the window. The local building regulations don't allow the ledger to be put into the bricks under a window, so the ledger had to be bolted into the slab, hence all the prep work.

The floor joists will connect into the ledger using Pryda joist hangers, and to enable this, the bottom of the ledger board needs to line up with the top of the bearers. 


The big question is, what do you use to hold up the piece of timber for the ledger, and keep it level against a flat concrete surface, while you are trying to drill and bolt it down, when there is only a few centimetres clearance? The answer? Whatever you can find laying around!

I used a couple of methods to help. First I marked up and drilled the holes in the ledger timber where the bolts would go. I then clamped a couple of joists to the bearers so they can "push" the ledger against the wall. Next up I grabbed whatever bits of flotsam and jetsam I could find to prop up the ledger timber, all the while keeping it level. Finally I used the product with a million and one uses, which according to Myth Busters is mankind's greatest invention, duct tape, which I use to hold it all in place. Is there nothing duct tape can't do!?

Below you can see the final assembled rig propped up and ready to be drilled.


Is there nothing duct tape can't do?

Once everything was held stable I drilled through the two end holes far enough to mark the slab, and then removed everything. Next I drilled the full holes into the slab using a hammer-drive drill and tungsten carbide bit, down to the appropriate depth, then cleaned them out and fitted in M12 Loxsin's.

Here's a tip for cleaning out the dust from drilled holes in concrete. There's no need for canned air or specialist tools, just grab a decent length of 6 mm poly garden drip hose, put one end in the hole, and the other end in your mouth, then blow! It works like a charm, just watch out you don't get it in your eyes if you're looking down the hole!

With the loxin's fitted in place I bolted on the ledger using the two end bolts, drilled the rest of the holes, removed the board, cleaned the holes, and fitted the rest of the loxin's. 


Before doing the final fit of the board I covered the inside with 110 mm malthoid flashing (per council requirements) then bolted it into the slab with M12 bolts and washers. Lastly I ran a strip of 45 mm Protectadeck stripping along the top and the job was done.

Ledger board loaded

On the "right" side of the deck the ledger board needs to be a little wider owing to the slab section of the landing being slightly lower so I used 110 x 45 MGP 10 treated pine for this section. Using the same methodology as the previous ledger section, I bolted it in as shown below.


A wider ledger was required for the landing

Now that the bearers and ledger are in place I can start laying in the floor joists. Below shows the plan for the joists.

Joist layout

The joists are 90 x 45 MGP 10 treated pine, and there's a lot of them! 33 to be exact. I'm using Pryda joist straps to hold them down, alternating left and right down the joists, and fixing with galvanised clouts. Below I am starting to lay them out.

So excited by joists!

I was so excited to see the joists go down! What can I say, I'm easily excited. The deck is now really starting to look like something. Slowly but surely the joists are creeping along the length of the deck.

Slowly the deck grows


The problem is however, I got so carried away with laying joists that I forgot a very important part. Laying the Protectadeck bearer protection strip along the top of the bearer! It had completely slipped my mind! What to do? Well....I could rip up all the joists I had laid and then put the strip down.....or not? I chose not. 

So I started laying the strip down from the point where I remembered! I'll fix it later somehow.

The joists continue ... with the strip installed

Eventually I hit the halfway point! You can see in the photo below one of the 300 mm noggins I made out of scrap up to help space the joists. I'd lay the next joist down, place the noggin in between it and the previous one, clamp across the noggin, and then fit the joist strap. Some of the joists were a little warped, so fitting the noggin and then clamping at either on the top or bottom (depending on the direction of the twist) of the joist would help straighten it out.

Inch by inch, row by row, one half to go

Using this space, clamp, fit and nail manufacturing like process, I quickly progressed to beyond half way and started moving towards the end.

Panorama. The progress so far.

Joist by joist, strap by strap, nail by nail. Looking ahead, below is where the stairs from the deck will lead down to the lawn area.

Getting closer

Eventually it was all done! There ended up being 35 joists in all, not 33, as I hadn't allowed for fitting around the down pipe near the door, and also I hadn't allowed for attaching a joist to the end of the ledger board which wasn't going to work, so I did have to juggle those around a bit.

Finished!

Next up I have to build the landing and steps for the back door. I've never done steps before, so this will be a new adventure!

Monday, 9 March 2015

The Pain of Dealing with Local Government Bureaucracy!

So let me tell you about this tree we had, and how it relates to the decking to be built.

As I said in an earlier post, all of the "trees of significance" in the housing estate are under a "heritage protection layer" which is managed by the local council. What this means is that if you do anything to any of those trees the council will come down on you like a ton-of-bricks and fine you using a formula based on the thickness of the branches you have cut on any of these trees. There is also an inspection regime, where the council can come onto your property every couple of years and check the trees to make sure you are looking after them. It's a pretty tight (and in my opinion draconian) regime that is meant to stop speculators buying up blocks of land that have trees, cutting them down, and then selling them again for more than they brought them. The fine system makes it prohibitive (and strangled in council red tape) to do so.

Now we had an issue that one of the trees on the property was dead. 


One Dead Tree
It wasn't just pinin'! Its passed on! This tree was no more! The tree has ceased to be! It had expired and gone to meet 'is maker! Bereft of life, it rests in peace! Its kicked the bucket and shuffled off this mortal coil, run down the curtain and joined the bleedin' choir invisible!! THIS IS AN EX-TREE!! 

Not so according to the council. To them it's a "protected" dead tree.

Now in order to get a "protected" dead tree "unprotected" you have to go through a number of hoops. First up you have to get an arborist report to confirm that the tree is in fact "dead". We used an arborist recommended by the council as I thought it would smooth the waters if it came from someone they were used to dealing with. While the arborist was at it, I got him to check the large Cypress, as in order to build the back deck I was going to need to trim the lower branches of the tree, so I may as well put both trees on the request. One inspection to remove the dead tree, one to trim the other. $300 per tree.

Cha-ching! Arborist report = $600. 
Then lodge a planning permit with the council. 
Cha-ching! Planning permit = $500. 
Attached to the planning permit needs to be the tree removal permit. 
Cha-ching! Tree removal permit = $150. 

So I am going to be out $1,250 without even putting a saw to the tree yet! This is just for permission to put the saw to a dead tree.

After all the permits were lodged the days turned into weeks, the weeks into months. Checking with the council at least on a weekly basis, I was given the standard line "the application is being assessed". 

Finally after six months the council came back to me:

Council Officer - "What's this about a deck?"
Me - "What deck?"
Council Officer - "Your arborists report refers to building a deck"
Me - "It does?"
Council Officer - "Yes, your request to prune the large cypress tree states that you want to trim the lower branches to enable to construction of said deck"
Me - "So it does! What does that mean for getting rid of the dead tree?"
Council Officer - "Well you'll need to amend the planning permit and include details on the construction of the deck"
Me - "What kind of details?"
Council Officer - "It will require all the planning and construction details, what it's going to be made of, where it's going to sit, where the post holes are, how it's attached to the dwelling etc. all in triplicate with the amended permit fee" (Cha-ching!) 
Me - "$&@K!" (after I got off the phone of course)

You see I wasn't actually there when the arborist came around to inspect the tree, my wife was. When the arborist asked why we wanted to remove the lower branches of the cypress tree she unknowingly responded "so we can build a deck", which the arborist duly noted and included on the report, which I didn't read in any great detail. Silly me.

To cut a very tortuous story shorter, four more months went by after creating plans and lodging more requests, and over $2,000 spent, I finally got the planning permit from the council to:
  1. Remove the dead tree (yay! "but must be replaced with a similar cypress species" boo!)
  2. Prune the lower branches of the large cypress ("but only by a qualified arborist")
  3. Permission from the planning department to build the back deck within the protected tree zone ("but a building permit would be required from the building department" and a whole bunch of other conditions about protecting the tree roots etc.) 
HALELUYA!
Follow my blog with Bloglovin