Showing posts with label backyard. Show all posts

Monday, 29 August 2016

Building a Green Wall - Part 2

So in the last part 1 entry I'd created a quite significantly large and quite ugly looking black and blue wall. Well now in part 2 we're going to make it spectacularly beautiful!

The right hand large blanket added and setting up for the top middle

The greenwall blankets were dead easy to put up. In the photo above you can see the right hand blanket attached, and I'm setting up for the middle one. To attach it I first clamp the blanket to the top of the wall using quick-grip clamps so I can line up the blanket. You need to take care here to ensure that it's stretched tautly otherwise when you load it up with soil it will bow out from the wall.

Once clamped I then drilled a small pilot hole into each eyelet. Remember blue-board is effectively a sheet of concrete, so you need to use a masonry bit to get through it! I then finally drive in a 50mm hex-head screw with washer to secure the blanket to the wall, again making sure that everything is stretched nice and tight before finally tightening up all the screws.

For the large blanket there are 5 fittings across the top, 3 in the middle, and then 3 at the top of the bottom row, which all lined up with the 70x45 battens I had put in when making the frame.

Right and middle completed

Above shows the two middle medium blankets fixed in place in the centre panel. That leaves the large one on the left to be done next!

The large blanket

Above shows a closer view of the large blanket and it's really quite an ingenious design. The kit comes with drip feeder tubes and connections that slide into the fabric above each row of planter pockets. The water from the drippers soak the blanket (remembering it's rubber backed) which in turn waters the pockets. Very clever.

All blankets mounted

This shows the completion of putting up the blankets. Once they were finished I then painted over any of the blue that was still visible to give it a uniform look.

Nice job

Here's the view down the side of the yard. The next job is to fit on the Holman Greenwall planters at the bottom of the large blankets. There's 3 for each side, 6 in total, and luckily for me 3 of the units is pretty much the exact width of the large blanket! Anyone would think I'd planned it that way!

Mounting the planter pots

This shot shows the planter pots fitted on to the bottom under the large right hand blanket. To fit them you have to fix a mounting bracket to the wall that the unit then hangs from. Each unit then clicks into the next one like kids building blocks. For watering you just run a pipe in the bottom of one with a standard snap-on hose connector. If one unit is connected to water, they're all connected, and then there's then an individual dripper for each pot. Another clever design.

Build finished. Now onto the plants

Above is the completed wall with all the blankets and pots in and plumbed. I also added some 12v up and down lighting on either side of the middle section to highlight the plants at night. When everything is done I'll also hook some spots on the ground in front of each panel.

So all that is left now is to plant the plants! There's 44 needed for the large blankets, and 20 for the two medium blankets, and 48 for all the pots. That's 112 plants (and then some as I was to find out) to buy and plant, so I'd better get cracking!


Centre section planted

Above shows the completed and planted centre section. The wall faces due south and is pretty shaded for much of the day, so I picked some sun loving cascading plants for the top level, and then worked my way down the wall until I got down to very shade tolerant ferns at the bottom. I brought the plants in pairs so it would give the wall a nice even look. I also ended up buying more than 112 as some of the bigger pockets can accommodate two or three medium plants, just to give more variety.

The guys at Jamie Durie emailed me a planting guide on request which was pretty handy, but it was mostly for a Sydney climate, not a Melbourne one. So I took it down to the local nursery at Bulleen Art and Garden who helped me pick the kinds of species from the list that I should be planting. 


After the first section it was pretty easy, I just used a good quality general purpose potting mix to fill the pockets to plant into.

Starting to plant the right side

Above you can see I am getting ready to plant out one of the large blankets. For the bottom row small pots I just bought a few trays of Petunia and Impatiens which were super cheap, and allowed me to plant all the pots. I also spot planted the leftover ones randomly in amongst the bigger plants to give that burst of colour in all the green.

For the placement of the bigger plants, as you can see in the picture, I would just drop the whole pot (or pots) into the pockets to see how it would look when planted. The big pockets can hold a large pot or two medium pots. Doing this first allows you to mix and move things about before taking the plunge and planting the plants permanently.

Once I was satisfied with the look I'd then start at the top row and half fill the pocket with potting mix, then de-pot and drop the plant in, and finally fill in around the plant with more mix. When it was filled I'd then give the pocket a bit of a bash with my fist just to settle the soil and plant in, water it in well, and then move onto the next pocket.

Planting done

Pretty soon the whole wall was done! In terms of costs it was around $600 - $700 per panel to plant them out, but the final product was worth every cent! I'm really happy with the result.

Job done. Time for a beer

This is now my number one favourite spot, and thanks to the beautiful new green wall we have some privacy while still being able to say hi to the neighbours, and we're doing the planet a favour to boot! 


With the trailing plants on the top row I have begun training some of them to go over the back of the wall as well, so that it will eventually soften the look on the other side too.

The lunch table is set and the BBQ is on!

So that's it for the green wall project, I hope you enjoyed the journey as much as I enjoy the result on an almost daily basis. Until next time, stay green!

Tuesday, 23 August 2016

Building a Green Wall - Part 1

Remember the neighbours trampoline after finishing the deck? Well I love the neighbours kids and all, but them bouncing up and down, and in turn watching us having lunch on the deck (or me trying to sleep!) wasn't the best, so I resolved to have a go at doing something about it. 

Like Hadrian in England and the Chinese with the Great Wall, I also chose to build a wall, but in this instance a GREEN one!

So after discussing with the neighbours and getting the OK it was full steam ahead with the green-wall construction project.

I must do something about the view

Now there's a number of different options available in a wide, wide, range from the really cheap, to the very, very expensive commercial/industrial models. So as always I hit up Google with a few searches on "building a green wall" and "building a vertical garden", from which you'll find lots of options available as well as plenty of DIY information.

You'll find there's a lot of "pot planter" options available on the market which you can pick up from various distributors or even your local hardware supplier. 
These have the advantage of maximum flexibility. With the area I was dealing with, and the size of the wall I wanted to build, cost was probably going to be an issue though. The whole thing it's 6m long and nearly 3.5m high at the highest point!

Holman Greenwall
So looking further into pot kits I came across the Holman GreenWall. It's a great product with snap in irrigation and pots, that allow you to change the pots (and hence the plants) in and out at will.  
The limitation for my use is that it only has 8 pots per $69 unit (priced from Bunnings) and to cover the entire wall was going to take quite a few thousand dollars worth of units, not to mention all the plants needed to then fill all those pots!

After further investigation and emailing, I finally settled on a local product that comes courtesy of Australian celebrity gardener Jamie Dury. He has a product called the Greenwall Blanket, and it was going to fit the requirement just nicely, and without breaking the bank. 


The blankets come in three sizes; small 600x600, medium 1200x1100, and large at 1800x1800. They're hung up by eyelets built into the fabric, they're rubber backed for waterproofing, and they have an inbuilt drip watering system. Each blanket comes with varying size pockets for planting in, so you can have a variety of plant sizes across the blanket (as opposed to the pot systems where generally they're all the same size).

The area I want the wall to cover is 6m long and runs right along the edge of the fence. One of the things I also want to include in the wall is that it won't be a 100% solid wall (I do actually quite like the neighbours!) so I planned to leave some semi-transparent sections as part of the build.

Here's the plan I came up with:


The Green Wall Plan

The wall will be divided into three sections, 2 wide sections on either side, and a narrower one in the middle. These sections will be divided up by four 600 mm wide OutDeco Panels (you may remember I used them when screening the side deck and the garden utility area), using the "Bungalow" pattern, which will give me 80% block out/privacy while still allowing me to still say hi to the neighbours!

For the Greenwall blankets, I will use two large blankets for the left and right outside panels, and two medium blankets mounted vertically for the centre panel. Because the large blankets aren't quite as long as two medium blankets, I plan to fill out the bottom of the large blankets with the Holman Greenwall units, which I'll plant out with seasonal annuals or herbs in the smaller pots, giving me the flexibility to easily change them around. I'll need 3 units each side, 6 in total, which shouldn't break the bank.

So that's the plan, but first things first, is to put 8 posts into the ground to support the wall using 125x75 rough-sawn cypress. There's a 50 cm drop along the fence line, so the last post will be longer than the first.

A row of posts to start

Above you can see the posts dropped in and concreted with the tops levelled off. Let me tell you it was far from an easy job! 

As you might remember there's a significantly large tree in the yard (you can see it in the top photo) and when the neighbours property was completed they put in what is called a "root block". This is essentially a large and deep excavation filled with concrete, designed to stop the roots from the tree entering their property. Well this root block chunk of concrete was sitting pretty much right where I needed to drop the posts in!

It wasn't all bad news though, as there was luckily a 60cm gap between the block and the side fence which was just enough space to drop in the post hole digger with a 50 cm auger attached. JUST enough! Believe me it was a VERY tight fit! 


The block trench wasn't in a straight line either, and as I worked my way down the row of holes that 60cm gap got narrower until it was down to under 50cm. At that point there was no choice left but to head down the hire shop to get a large electric jack-hammer to cut into the root block concrete.

This should do the trick nicely

Eventually after all screwing around with the post-hole digger, the jackhammer, and after a lot of blood, sweat, and swearing, I ended up with eight 70 cm deep holes and all posts in and set down in concrete. Phew!

I can see it already

Above clearly shows the outline of how the wall will look in terms of cover-up. I levelled off the top of the posts by running a stringline, then constructed a wooden jig to support the circular saw. With the jig fitted to each post I then ran the saw around to make them all nice and even.

Once the posts were finalised I then laid some 70 x 45 horizontal timber battens to brace the structure, and importantly to support the greenwall blankets. I notched in one across the top, and then further horizontal members to line up with the eyelets on the blankets in each of the three sections.

Outta sight!

Once the frame was completed, you can see above that I then covered the larger sections in HardieTex blue-board and then fitted in the Outdeco screen panels. Harditex is water and rot resistant, so was going to serve as an excellent backing for the blankets. 

You can also see I got busy with a paint tin and brush, painting the entire structure to match the neighbours fence colour which is charcoal black (you can see their fence in the background top right of the photo above). Thinking ahead I'd painted all the posts, railings and the back of the HardieTex before mounting so I didn't need to go next door to paint the fence!

That's a tall wall

I didn't need to paint the front of the blue board as it was going to have the blankets mounted onto it so I left them blue, but painted around the edge anywhere the board might have been visible under the blanket. 

Why is the middle one painted black you may ask? Because I painted it on the wrong side when I was painting them! You'll have to trust me it's black in the other side as well!

Getting ready to mount the planting blankets

So that's the wall structure completed! It's certainly ugly, but just wait until the plants go up!.

Next time we'll mount the blankets and pots, fit the drip watering system, and lastly plant the plants all in part 2!

Wednesday, 16 March 2016

Deck Building. Landscaping Around the Deck

So the deck is done at last, at least in terms of construction, now it just needs to "fit" in the back yard. Right back when I started laying the yard out I always had a vision of some kind of stairway to take me up from the paved area and onto the deck. However the other staircase I built already suited that purpose, and I really didn't want two sets of identical stairs off the same deck.

I needed some inspiration to go between the white lines!


Basic steps. What to do?

On a visit to Japan we went to Ōkōchi Sansō (大河内山荘 Ōkōchi Sansō, literally "Okochi Mountain Villa") which is the former home and garden of the Japanese period film actor Denjirō Ōkōchi, and is located on the edge of the famous bamboo forests of Arashiyama in Kyoto. This gorgeous garden is open to the public (for a fee) and served as inspiration for what I decided to do with the alternate path.

Below shows a great example of a path that leads up through the garden. The stepping stones are made from large pieces of local stone, and assembled in such a way that they look part of the natural landscape, but still indicate the path to follow.

A natural rock path disappearing around the corner

Periodically along the path you come across these gravelled areas as you can see below, set to resemble flowing water coming down the hillside.

A beautifully landscaped gravel path

From these gravelled areas the path then leads further along, using the natural stone as steps meandering up the side of the hill and throughout the garden.

The mysterious path continues upwards, one way

So using these photos for inspiration I called my favourite landscaper Stefan from Stefan's Landscape Design to have a look at what he could achieve. As always he looked at the photographs and understood exactly what I was after, and set about doing it.

The brief was to build a natural looking rocky outcrop with a stone path snaking up through it, containing a number of gravel landings linking the path to each switchback up the slope.

Two days later with a pile of rocks and a bobcat he achieved exactly what I was after! You can see below the landscaping prior to me enclosing the deck around it.

Now that the landscaping is complete I can enclose the last part of the decking

Once enclosed, the decking was now complete. From the circular paved area at the bottom the path goes up three stone steps to the right to a gravel landing, then switches back four steps to the left to the next landing, and then finally takes three more steps up to the right to meet just below the bottom of the decking, leaving one step up to the deck proper. He'd nailed it completely!

The landscaping and decking completed

He'd also included an extra gravel landing at the top as a lookout across the yard as you can see below with the gravel area to the right shown below.

The steps blend in faultlessly with the decking

Below shows the completed deck and garden area nicely planted with some ferns, mondo and dwarf pine shrubs.

The decking now landscaped in with the rest of the yard

The alternate path is now complete with easy access from the circular paved area up to the deck proper, but not in a obvious staircase manner. Call it a secret short cut if you like, because for all intents and purposes it just looks like a rock garden, but once you recognise the path, it draws you upward (or downward) to explore the trail.

The circular paved area is now linked to the decking via the rockery path

Unfortunately one thing fell victim to the construction, that being the back lawn. The bobcat moving back and forth carrying the heavy rocks and soil destroyed what was left of it. Truth be told it was pretty much dead anyway. Ever since laying in the turf, regardless of it being a shade tolerant species, the large pine tree slowly and surely started a war on the grass by dropping pine detritus upon it every time the wind blew.

I guess if I went out every weekend with a blower I may have kept it alive a little longer, but by the time I realised what was going on, the lawn was dead with the exception of one small area that was free from the tree. The bobcat finished the job and killed the remainder. RIP lawn.

RIP back lawn. You were great while you lasted.

What to do? Should I plant another? It wasn't a prospect I looked forward to. A little investigation and I settled on the artificial option, which would never die, well at least not for 25 years or so.

I went to a few suppliers and finally settled on a company called Synturf that manufactures the product locally. It does cost about 3 times more than instant turf, but they do everything for you. They start by coming in and digging out the old turf; then constructing and compacting a base to put the turf on, and finally lay and settle the turf on top pinning it down into the base and loading it up with sand to hold it firm.

The product is called Everest, and has a brown fleck throughout the grass that gives it a very natural look. Admittedly when some of the detritus from the tree falls onto the grass it looks more natural than ever! Everyone who sees it can't believe it's artificial grass, and it looks a million bucks as you can see.

The new lush green lawn is believe it or not, made of plastic!

So lets now take a trip back in time and as you can see below, this is the very first photo I took of the yard not long after we moved in. How different it looks now compared to back then. I remember we had to plant my son's Totem Tennis he got for Christmas that year in amongst the weeds.

Mowing the yard then was a case of getting out and hacking away with a brush-cutter. Things have changed!

We've come a long way since the beginning and the very first photo

Now you can compare it directly to below which shows the (pretty much) completed back yard. What a difference!

The completed yard sure looks different to how it started!

The new Synturf looks sensational, and the yard is now pretty much completed.

The new artificial turf has come up trumps

Below the deck is now ready for summer with many BBQ's to come.

All set and ready for summer BBQ's

Next time we'll apply a finish to the deck to complete the project.

Tuesday, 16 February 2016

Deck Building. Finishing the Flight of Stairs

One of the most popular posts I ever put up was building the frame for the flight of stairs that runs from the decking down to the lawn area. Well now that the top decking has been completed, it's time to deck the stairs. We're getting close and the end is in now sight. The last piece of this grand puzzle to be completed is literally a puzzle!

As I've gone to so much effort to deck everything, I wasn't prepared to leave any of that treated pine from the stair stringers showing. Adding to the complexity however is the whole "nail free" concept. The Deck Master system wasn't going to be much use on the steps as the treads are only three boards across, and to top it off I had run out of the Deck Master slotted timber! 


So the plan I came up with was to use the wood plugs which I thought (at the time!) would be less fiddly. Rather than use the Deck-Max plugs though as I was going to need hundreds of these things, I decided to make my own to save some money! 

I sniffed around online and came up with a vendor in Sydney called "The Wood Works" that sells a plug cutter and counterbore set. This consists of two drill bits in the set; one for cutting the 10mm wood plugs, and the other to counterbore the 10mm holes that the wood plugs fit into. Sounds simple.

Image courtesy "The Wood Works"

To use the plug cutter you need a drill press (or a plunge router) to hold the cutting bit perfectly vertical so that the plug comes out straight. Be prepared for this as it's a bit of a chore! 

It's a 4 step process:

  1. Turn on the drill and place the timber
  2. Slowly drop the drill press to cut the plug and then raise it once the cut is finished
  3. Turn off the drill press
  4. Using a small screwdriver, knock out the plug from the centre of the drill bit
Go back to step 1, and repeat 850 times! I had plenty of scrap off-cuts to work with from which the plugs are cut. 

Eventually you'll end up with a bag full of wooden plugs, but it doesn't stop there. To make the 10mm plugs easier to fit into the 10mm holes, you have the chamfer them on one end with a sander. For this I taped up my fingers (or else the sander will eventually go through your fingernail as I found out) and loaded the sander in a vice. Phew, this is a lot of effort for a finish! Maybe it would have been easier to buy these, but where's the satisfaction in that?

Eventually I was ready to go. The plan was to start with the top edge of the outside stringers, then infill the treads and risers, and finally veneer the outside stringers to match and knit in with the horizontal boards on the front side of the deck. Just like a giant 3D jigsaw puzzle!

Below shows the beginning of setting the boards onto the top edge of the left hand stringer. They have to be lined up such that the boards on the risers and treads sit will sit flush when fitted, but also line up with the horizontal facing boards on the deck!

Bring on the mitre joins. Starting out with the first boards.

I'd first cut the board to fit, make sure everything lines up and is level, then glue the underside with "liquid nails" and clamp it in place. Next, using the 10mm counterbore tool I would drill the hole, then fix a decking screw into the hole, lastly when the piece is glued and screwed, I'd glue and bang in my pre-cut wood plugs. When it's all dried you then cut off the excess with a vibrating multi-tool and give it a sand to finish. No nails showing!

Below shows the progress down the left hand side which is about 3/4 complete.

Fair progress down the left hand side

Cut, fit, glue, clamp, drill, screw and plug, over and over. Eventually as shown below I reached the bottom of the left hand side. Like a jigsaw I found it very therapeutic and relaxing work!

Left had side completed

Once the left was completed, I moved across to the right hand side and finished it to match.

Right hand side completed

Now both sides were done I could start putting down the treads, and then finally and hopefully, walk down the stairs for the first time!

Looking at both sides

Once I had the outside edges of the two side stringers completed, I started on the top stair tread sizing up the boards and riser as you can see below. Measure twice, cut once!

Sizing up the boards for the first step

Below shows the first step and riser completed and fixed in place and I can finally stand on the top step! Note the notch I had to cut into the rise on the centre stringer.

First step boards fixed down

The notch on the nose of the centre stringer is to accommodate the step lighting. I'm using the same lights to match the landing steps, with four of them to fit, one on every 2nd step.

Cutting the centre stringer to allow for the step light

Fitting the lights was easier than on the landing, as here I only had to deal with a single board whereas on the landing I had to fit the light in between two boards. 

Essentially I just found the centre of the board, marked out the square where the light will fit, then cut it out with a drill and jigsaw.

Sizing up the boards with the step light fitted

So three steps down with the first light fitted and it's looking pretty good. The extra effort in making sure the stringers were spot on when I was building the frame has paid off as everything is dead level.

Top 3 steps done

Below shows fitting the riser board in to make sure the gaps are uniform. I had some thin timber offcuts that I used to wedge around the board, and then used a large flat blade screwdriver to level it all in place nice and square. Finally I then drill the holes for the screws and plugs.

Wedging up the riser board to make sure it's centred

So here is the completed stair with all the treads and riser boards in place. I left all the wiring tied and hanging just behind the holes so I can now fit the rest of the stair lights in.

Putting in the risers to finish up the bottom steps

Job done as you can see below, with all the lights fitted in. Now there's just a matter of plugging a few hundred holes!

Steps completed

With the steps and deck front now completed, I can start the jigsaw puzzle down the side of the steps. Starting at the top left of the stair I carefully measure and cut the timbers to fit around the top edge boards to give it a 'continuous' look. 

Then like any other piece it gets glued, clamped, screwed and plugged. Each piece of timber is a unique cut to suit that step, so there's no mass production here!

Commencing the jigsaw puzzle

Below is a closer look to how I cut, clamp and space each piece of timber to fit. Using the left over Deck-Max biscuits from building the side deck gives me a perfect 3mm gap. I then use the clamps to hold in place while I glued and screw. Once it's set I just prize out the biscuits with a pair of multi-grips, ready to use again on the next piece.


Next step

So here you can see I have finished the timber puzzle on the left side of the stairs all the way to the bottom. 

Left hand side done

It's a bit of effort to go through to cut and round off each piece of unique timber, but I think it looks so much nicer than bare treated pine. Below is the right hand side plugged and polished.

The right hand side puzzle completed

Below shows the deck step lights on and working. They really give it a nice professional finish, and they're also very practical on a dark night!

Light it up!

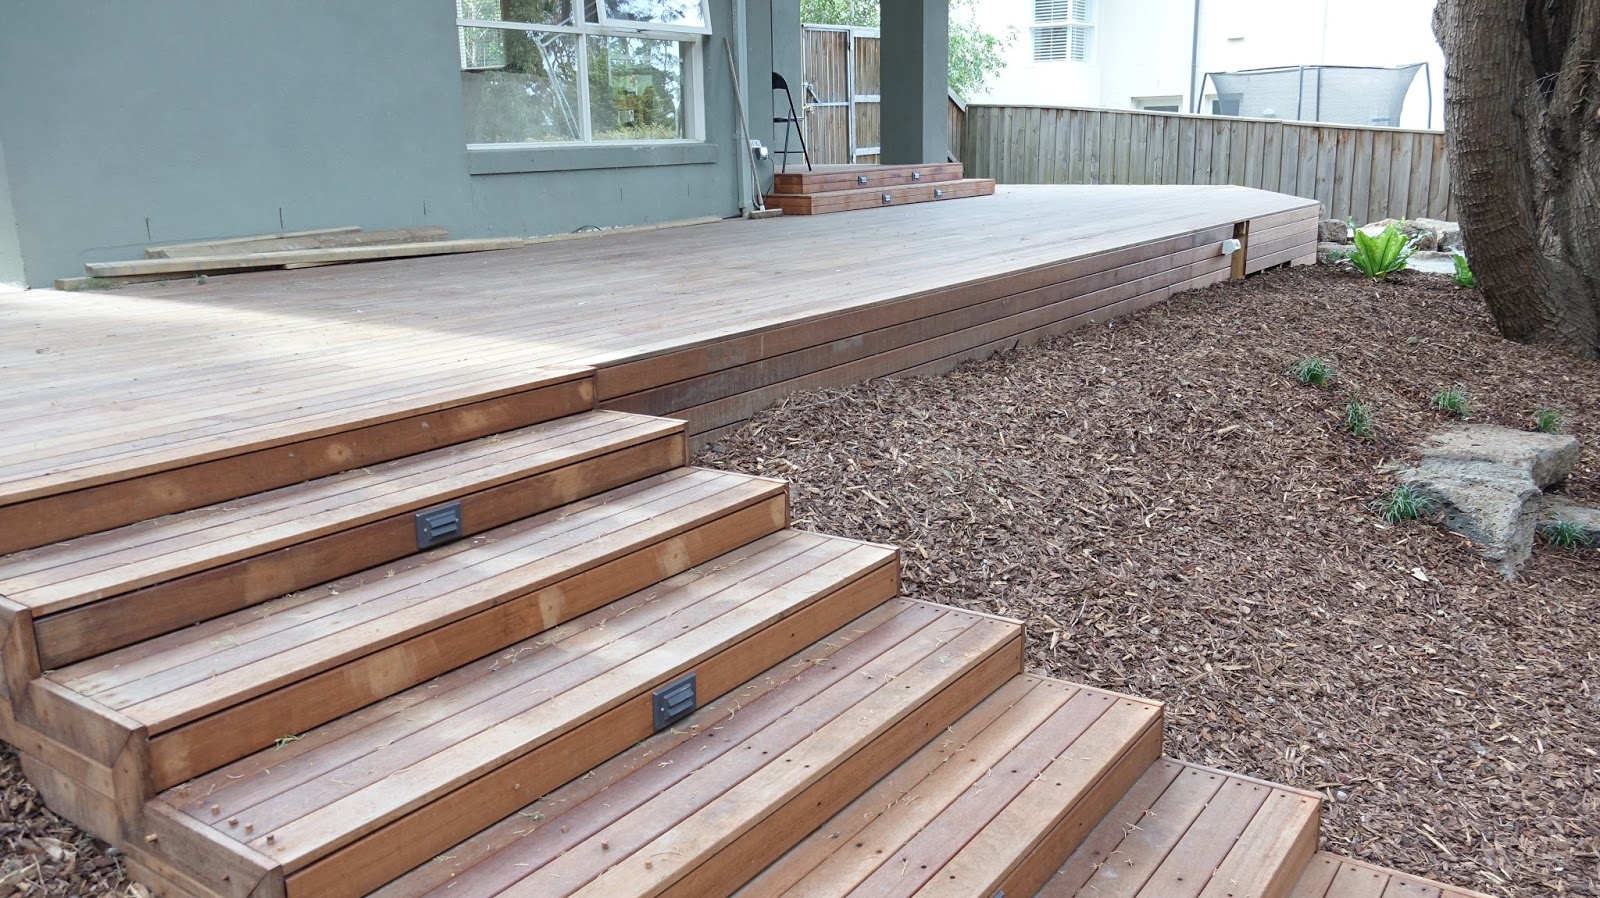
So here is the deck showing both sets of stairs completed (well almost completed, there's still the matter of plugging a couple of hundred holes).

Stairs completed

So that's it, job done, steps completed. I can tell you I've walked up and down them many times now, and they work as designed. There's not an ounce of bounce! Rock solid baby.

Worth the effort

So now the deck construction is completed! Time for a well earned beer. 

Next post we'll look at landscaping around the deck to incorporate it into the rest of the yard, as well as cleaning and applying a finish.